Pages

Thursday, November 17, 2011

Cricket is Back!

Two years ago, a box arrived in the mail addressed to our three children, sent directly from Santa Claus. Inside was our own personal elf, sent to watch over our children each day leading up to Christmas. Each night he flies home to the North Pole and fills Santa in on their behaviour during the day.
On Christmas Day, Cricket returns to his home in the north, waiting for the day during the following November that he will travel back to us for the next Christmas season.

This year, he arrived the Saturday morning right after Hallowe'en. The kids awoke to this:

Cricket had arrived and left a fully prepared breakfast and a note chronicling what he had been doing over the last 10 months. There were also some simple instructions about behaviour for the months of November and December.
The kids were so excited about the arrival of Cricket - she signals the beginning of the Christmas Season. My husband and I were most excited about the fact that our 7-year-old son could read the whole letter from Cricket without any aid!
Cricket had prepared a baked egg dish, and left strict instructions that it tasted best with a little bit of ketchup. And on the side, there was mugs of hot chocolate, complete with 5 mini-marshmallows for each of us.
The table was set with holly covered dinner plates and each place setting had its own candy cane. Candles lit the table in the early morning light.
Breakfast was yummy! Family time is wonderful! And Christmas - let it begin!!

Please leave a comment. I'd love to know you visited!

Sunday, November 13, 2011

A New Obsession......

I spend too much time on Pinterest. No- that is not my new obsession. I do spend lots of time "pinning" a large variety of recipes, decor ideas, craft projects and pretty pictures, but I am proud to say that I actually make an effort to use my "pinned" items as inspiration.

But I came across this picture the other day.

I am not sure if it is the colour combo, the mix of textures or the simplicity of the craft, but I was in LOVE.Look at those lovely little hand-made flowers! Luckily I was easily able to locate a tutorial detailing how to crochet these darling roses.
http://www.planetjune.com/blog/free-crochet-patterns/basic-rose/

I spent 4 hours in the car this weekend, driving to and from my my mother's house and I am almost embarrassed to say how many of these pretty little roses I made!


Most of the flowers I created were pink, white and silver (for use in an upcoming project - stay tuned!) but I also whipped up a couple of chocolate brown roses for an alternate use.
My daughter wears a lot of chocolate brown and recently her favourite brown hair clips have gone missing. "Mommy-The -Crafter" to the rescue!


It was very easy to attach these crocheted flowers to some heavy-duty hair clips (my daughter has wickedly-thick hair!) and add an embellishment of a large pearl bead.
Lovely - and she ADORES them! If fact she changed her clothes this morning so that she could wear these brown clips to school today. : )

What do you think? My hubby thinks they are too big, but when you have this much hair, you need big acessories!
Hopefully in a couple of days I'll have my next crocheted rose project done. Come back and check it out!

Saturday, November 12, 2011

Pumpkins and Chocolate? OH YES!!

We probably went a little overboard with pumpkins this year. Really. Everytime the kids and I were anywhere you could buy them, we did! By Hallowe'en we had our own gigantic pumpkin patch growing near our front door.
Here is a shot of maybe 1/4 of our pumpkin plot:

As we were putting away all of the Hallowe'en decorations, post trick-or-treating, we began throwing all of our pumpkins, big and small, into the green waste bins.

Oh! I felt so guilty!!
All of those perfect little sugar pumpkins heading straight for the compost. How wasteful is that?? I know they are destined for a future as green fertilizer on the gardens of my local town, but really? Shouldn't we EAT them? Isn't that they are sold??

My guilt overtook me. Okay. So did the thought of my favourite pumpkin recipes. Mmmm....

How to take a pumpkin from decor to dinner? Very, very easy.

1. Cut the sugar pumpkins in half.
2. Scoop out all of the seeds and stringy bits.
3. Cover the open side with plastic wrap and microwave for 10 minutes.

4. Using a large spoon, dig out he softened insides, leaving only the outer shell. This is what the yummy guts look like:
5. My pumpkin guts were a little stringy so I mashed them up with a fork.

Now onto my favourite pumkpin recipe:

Pumpkin Chocolate Chip Squares

Ingredients

  • 2 cups all-purpose flour, (spooned and leveled)
  • 1 tablespoon pumpkin-pie spice
  • 1 teaspoon baking soda
  • 3/4 teaspoon salt
  • 1 cup (2 sticks) unsalted butter, room temperature
  • 1 1/4 cups sugar
  • 1 large egg
  • 2 teaspoons vanilla extract
  • 1 cup canned pumpkin puree ( or some of the yummy homemade puree you just made!)
  • 1 package (12 ounces) semisweet chocolate chips

Directions

  1. Preheat oven to 350 degrees. Line bottom and sides of a 9-by-13-inch baking pan with foil, leaving an overhang on all sides. In a medium bowl, whisk together flour, pie spice, baking soda, and salt; set aside.
  2. With an electric mixer, cream butter and sugar on medium-high speed until smooth; beat in egg and vanilla until combined. Beat in pumpkin puree (mixture may appear curdled). Reduce speed to low, and mix in dry ingredients until just combined. Fold in chocolate chips.
  3. Spread batter evenly in prepared pan. Bake until edges begin to pull away from sides of pan and a toothpick inserted in center comes out with just a few moist crumbs attached, 35 to 40 minutes. Cool completely in pan.
  4. Lift cake from pan (using foil as an aid). Peel off foil, and use a serrated knife to cut into 24 squares.
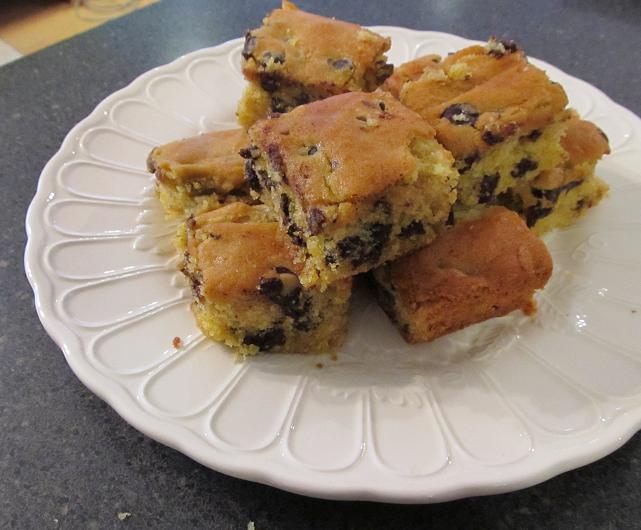
Oh yeah! Look at these!
I love how moist these squares are. They are divine, and honestly, they don't taste like pumpkin. I think the pumpkin just adds to the warm colour.
By the way, don't cut these squares until they are completed cooled. Otherwise the squares just mash and rip and all of the chocolate comes out on your knife.
Mmmmm......time for tea....and a pumpkin square!

Tuesday, November 8, 2011

A Rainbow of Granny Squares

Lately I have been crocheting a lot of baby blankets using leftover pastel yarn- pale blue, pale pink, pale yellow. Although I ADORE those colours, I was ready for a change of pace!

And that's why I began THIS:Oh yeah! Look at the rainbow here! I have just as many leftover balls of yarn in these bright, saturated colours so I dove in head first.

I picked most of my colours from the mixed variagated yarn I used in the first few squares I made. Then it exploded from there!

My hubby says it would be a perfect baby boy blanket. I have to agree. My boys are very well "blanketed" already (mostly from Nana!) so this homemade "blankie" will find it's way into another child's nursery soon!

I have collected another basket of leftovers, ready for another crochet endeavour. I think I have had enough of granny squares for awhile. I think I might attempt a zig-zag style blanket next.

So, give me month or two - and I'll have another crochet"ta-da" to share!!

Saturday, November 5, 2011

A Few Hot Glue-gun Burns & A Pretty Paper Wreath

Sometimes crafting is painful. I can't even count how many hot glue-gun burns I gave myself while completing this paper wreath!

But I think it turned out beautifully, if I do say so myself!

Though time consuming (and painful at times) it was really easy to do.

To begin, I cut 6 different patterned scrapbook papers into 100 1"x 6" strips.
I folded the strips in half then used the glue-gun to hold them into a loop shape, flat at one end.


My loops were then glued onto a foam wreath form, overlapping each loop under the previous one by about 1 inch. I was also careful to mix the patterned papers up so that no 2 loops of the same colour were close together.

Around and around I went - it took nearly and hour (mostly because my toddler kept getting out of bed and I had to keep returning him there!) but it came together nicely in the end.
I am not sure exactly where I will hang my new paper wreath. There are plenty of closet doors around my house - which one needs some holiday colour??
Thanks for visiting. Please leave a comment so I know you have stopped by!

Wednesday, November 2, 2011

From Garish Gold to Perfect Pink!


This year I vowed I would get rid of any Christmas items I haven't used in recent memory. So there I was, the day BEFORE Hallowe'en, going through my boxes of tree ornaments, culling and purging like I was on "Hoarders" or something!

And there were so many! I'd been collecting ornaments since high school - and let's just say, it's been A LONG time since high school!

I had a ton of cheap plastic baubles and balls leftover from our early married years when we bought all of our ornaments from Wal-Mart in sets of 64 or something!

Here are the best ones - garishly golden pinecones and cherubs.
Hmm...these just aren't my style anymore. Time to get rid of them...or maybe.....
I can just hit them with a can of flamingo pink spray paint! Oh yeah!

After 3 good coats on either side in the fresh air of my garage, these lovely little beauties appeared!
I'm in love. A little pretty, and a little girly and a whole lot kitschy, but perfect to go with my new Christmas Decor theme for 2011 - RED, PINK, BLUE & GREEN.

My daughter thinks her mother is a genius.
"What else can we paint pink, Mommy?"

(Speaking of pink, do you see the rosy little cheeks on her? Couldn't you just eat her up? )
Thanks for the visit. Stop by again soon. I'm sure I'll be doing MORE CHRISTMAS craft projects VERY soon!

Mmmm...Gingersnaps....

I haven't made these in ages! Thank goodness for Pinterest! It was here that I was reminded of these delicious cookies!
I love 'em - and they are nut-free and pack perfectly in the kids' lunches.
~~~Gingersnaps~~~
2 cups sifted all-purpose flour
1 tablespoon ground ginger
2 teaspoons baking soda
1 teaspoon ground cinnamon
1/2 teaspoon salt
3/4 cup shortening
1 cup white sugar
1 egg
1/4 cup dark molasses
1/3 cup cinnamon sugar
Directions
1. Preheat oven to 350 degrees F (175 degrees C).
2. Sift the flour, ginger, baking soda, cinnamon, and salt into a mixing bowl. Stir the mixture to blend evenly, and sift a second time into another bowl.
3. Place the shortening into a mixing bowl and beat until creamy. Gradually beat in the white sugar. Beat in the egg, and dark molasses. Sift 1/3 of the flour mixture into the shortening mixture; stir to thoroughly blend. Sift in the remaining flour mixture, and mix together until a soft dough forms. Pinch off small amounts of dough and roll into 1 inch diameter balls between your hands. Roll each ball in cinnamon sugar, and place 2 inches apart on an ungreased baking sheet.
4. Bake in preheated oven until the tops are rounded and slightly cracked, about 10 minutes. Cool cookies on a wire rack. Store in an air tight container