Pages

Wednesday, March 28, 2012

Let the Easter Decorating Begin!!

My oldest son needed a filling at the dentist today, so I HAD to take the whole day of of work.  Bummer.  It's not my fault that the whole event at the dentist lasted 25 minutes!  

Anywhooo.....I used some of my extra time to get started on my Easter decor in preparation for having my family, and my husband's family, on Easter Sunday.  

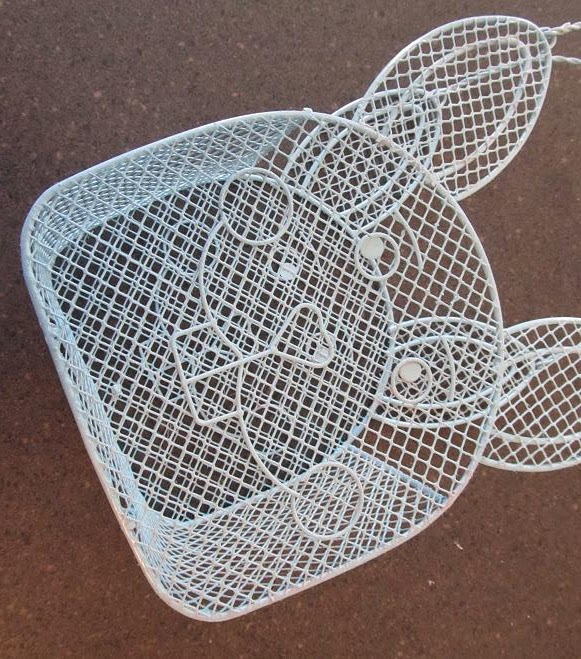
Recently I picked up this pink bunny basket at a thrift store for $1.00. 
I also grabbed these wooden tulips (probably from the '80's) for $3.00.  Though they were peach and mint green, I saw some potential!!

See?? There you go.  Already looking better with some fresh, vibrant paint.  
And the bunny basket - he got a makeover too. I hit him with a can of aqua spray paint!!

I hid some floral foam in the basket and covered it with yellow Easter Basket grass.


And in went my freshly painted tulips.  I added some fake green ivy as filler and to add some lush-ness to the basket.  Last, but not least, in went my little frog on a stick.  I felt he finished things off quite nicely!!

Up on the door it went.    Of course, when my youngest son arrived home after school today he said, "Look, Mom! the Easter Bunny has been here already!" Too cute.  

Monday, March 26, 2012

***Caution!*** Colour Ahead!!

Oh! Spring has arrived in our neck of the woods!  Usually, in our part of Canada, we get a taste of spring for a day or two, then it quickly reverts back to winter. We  usually have  a snowstorm (or five!) before spring arrives to stay.
However, I really think we have dodged that bullet this year.  It's cooler today than it was last week, but the air is clear and crisp, the daffodils are bursting forth and the kids want to spend all their waking hours outside.  HEAVEN!!

Colourful signs of spring?  How about these two-toned tulips I picked up on the weekend.  Yellow and red - lovely!
And the sky, yesterday afternoon.  Could it be any bluer??
The kids played on the swings (and in the mud) all day yesterday.  Luckily I was able to take some time from all of my "mommy chores" and join them outside for an hour or so.
I took my latest knitting project out onto the deck, too.  I was one square short of finishing-up on some buttery-yellow goodness.
And here it is in all its sunshiney-yellowness:

TA-DA!!  20 squares  stitched together in a basket weave pattern.  I don't think I have ever KNIT a baby blanket before.  I thought it would take much longer than it did.  
But I averaged one square a night while hubby and I watched our favourite shows in the evening after the kids were in bed.
Hmm....Now that I see my blanket posing on my family room couch, I really think I need to add some more yellow to our blue and green room.  Maybe another, full-sized yellow blanket is on the horizon.....
But not before THIS is done!!
I began crocheting these as soon as the last thread was sewn into baby blanket.
I'd seen these floating around Ravelry and Blogland for months and I just HAD to make some too!

I am thinking a mix of red and blue (light and medium) to go with the daisies.  What do you think? Maybe this will be the full-sized blanket for our family room couch......
We'll see......


Sunday, March 25, 2012

Rainbow Party Decor

My little lady turns 6 this week so we held her birthday party on Saturday. She couldn't wait for the day to arrive and finally it did!! 
(The t-shirt is from Carters.)
I've had a busy week with extra school prep, a sinus infection and this party to plan. Luckily hubby offered to anything I needed him to do.  Anything, you say?  Well then- could you please weave some paper placements for our little girl's party?? 
Of course he obliged!
They turned out great.  Thanks honey.  

With the leftover paper strips, I put the Little Lady to work.  
Any kindergarten kid can do this, right??
Once these were up, I went to work with the tissue.
I LOVE these.  (Thank-you Pinterest!)
I picked up a bag of these at the Dollar Store.  Lots of colour for next to nothing........
...especially when you pair them with a $2.00 wreath from Michaels!
One of the little girls at the party said our house was the prettiest place she'd ever seen.  (I'm sure it was the paper chains and rainbow placemats.  : )  )


Monday, March 19, 2012

Rainbow Party Photo Pennants

I was a little short on time a few weeks ago when I really needed to send out my daughter's birthday party invitations.  So I ordered some from here:

I sent her a digital photo file, the party info, the colour scheme  and the theme, and this is what she came up with:


I LOVE them. So does my little lady.  I took the digital file of the card to my local photo printing place and quickly whipped off ten 4x6 cards of the image.  It wasn't until I got home that I realized  that in printing them in that size, the bottom edge of  party information was cut off and hard to read.  So back to the store I went to print them in 5x7 size.  That worked out much better!

But now I had 10 of these mis-prints.  They were still pretty cute.  What could I use them for??  PARTY DECORATIONS!! YES!!

I had been collecting rainbow scrapbooking papers to use in the party decor.  This paper  had rainbow plaid on one side and red with white polka-dots on the other.  Using an edge punch, I cut a pretty edging to cover the words on the the mis-print photos.
The red ruffle pops nicely on the rainbow card.
Good start, eh??
To go in between the photo pennants, I cut some rainbow plaid pennants of the same size and decorated them with some dotty stripes.  I used some red lipstick coloured ink to jazz up the edges - but they still didn't look done.  

How about some hearts?  No, not just hearts.  Hearts with rainbows and hearts with polka dots!!

There we go.  Now the plaid pennants are almost as pretty as the pictures of my little lady!!
To string them together, I punched holes in the corners and strung them together with red yarn.  

My daughter gave this party decoration a "thumbs-up" when she got home from school.  She can't wait to see what I come up with next  for her RAINBOW PARTY!!

Sunday, March 18, 2012

Vintage Milk Glass Makeover

Look at this beauty! I found her at the ReStore in the little town I grew up in, where my mother still lives.  
At first sight, I was ga-ga over the hobnailed milk-glass shades, but the brassy-gold metal and scratched  up wood bits were far from pretty!
But for $15.00 I was willing to take the chance with a makeover involving a few different shades of spray-paint!
Out came the painter's tape - I wanted to paint the golden areas silver and the wooden parts antique white.  It was a two-part paint project. Lots of taping and re-taping in other areas.    
Then after several layers of paint (that yellow-y wood just wouldn't cover!) it was time to put it all back together, re-work the wiring and hang it from the ceiling.  And not just any ceiling.  It had to go in the 20 foot ceilings in our stairwell!!

My father-in-law assisted my hubby with all of these steps.  More hands makes light work!!
This is my father-in-law, Jim, checking the final height.  
And here she is!!  TA-DA!  Doesn't she look marvelous??  So  much tidier and brighter and perfect for our vintage-y styled stairwell.  This is the last area of our home I am working on. As you can see, I am in need of a covering for the window behind and I have a collection of plates I would like to hang for some extra colour.  

But for the now, the light is a lovely new addition.  
Here it is, glowing after dark.  We chose yellow-y bulbs to make a warm glow.  
Oh yes.  I love it more and more every day.  

Saturday, March 10, 2012

Leavin' on a Jet Plane...

So - I've spent the last few days packing several of these (well - ours aren't nearly this cute!)


So that first thing Monday morning, we catch a flight here:


Spend some time on one of these:


And visit here:


And make tons of memories for these little cuties:


See you on the 17th!!


Thursday, March 8, 2012

A Stitch in Time....

I found this Etsy shop while reading through posts on my Blog List.  I love that I can find new ideas and craft inspiration by simply visiting another crafty person's blog and seeing what they are up to.

Charlotte is a designer specializing in embroidery patterns.  You can buy PDFs of her work or you can purchase pre-printed panels just like the one I am working one here.  
I haven't embroidered in years - we're talking 20 years!! I haven't stitched anything like this since my mother first taught me to do it back when I was still in elementary school.  
Funny, even though years have passed I can still hear my mother saying, "Make small stitches!"
Are these small enough??

I really like the sentiments that Charlotte has incorporated into her design.  Stitching over the words adds an emphasis and texture, hopefully catching anyone's eye.   


I placed it in a black frame and I plan on adding it to the gallery wall grouping in  our Family Room.    
See my lovely new jug and saucer set??  I fell in love with it at the local Goodwill and I had to have it! I figure I could swing the $1.99!!