Pages

Wednesday, October 31, 2012

Hallowe'en 2012 and the "I Love You" Painted Stepstool

Thankfully Sandy had blown through by the time the festivities for Hallowe'en 2012 began.  There was a slight drizzle and the temperatures were near freezing, but neither could damper the spirits of my energetic whooligans.  

I tried not to get too worked up about photos this year.  I snapped a few as the kids ate their  gourmet cupcakes and pizza and took a  few more as the kids were heading out the door.  No stress to get the perfect picture in the costumes this year.....


'Cause this year I planned ahead!!

Two weekends ago, when the sun shone brightly and the colourful leaves were still on the trees, I drove the kids out to a secluded side road, bribed them with candy and spent 1/2 an hour taking multiple pictures of each of them in their costumes.  
And I must say...I LOVE how they turned out!!

Bryn  as Darth Maul

Afton - my Tudor Princess

and Camden - my ferocious Dragon.  

I am SO doing this again next year and every year after.  I wonder why I hadn't thought of this sooner???

Thanks for indulging my mommy-side and looking at these countless pics of my babies. Let's move on to the decor now, shall we...???

~ ~ ~ ~ ~ ~ ~ ~ ~ 


My kids' bathroom has been an obsession lately.  I stenciled the walls, I changed to red towels and bath mats and created some mosaic art.  This past weekend I began a makeover on the shower curtain and have I have some new accessories almost ready. But this is my favourite part so far: 


This step stool has been part of our  life since our oldest son (who is almost 8) began to walk and needed to be able to reach the sink to wash his own hands.  It has been blue, green and most recently, orange.  But for this bath makeover, it received a slick coat of red.  

To add some details and some text, I began by cutting a swirl from thick cardstock using my Cricut.  I  decided where I wanted to locate this accent then traced it carefully and gently with a sharp pencil.


After I completed the tracing, I removed the paper cut-out and began filling the pencil lines in with white craft paint.  This called for a VERY steady hand!!
Here is the swirl after 1 coat of paint:


And here it is after two coats and the addition of a pink heart (by request of my daughter!)


To add the text to the top of the stool, I followed the same procedure - I cut cardstock letters, traced them and  filled them in-- this time with black paint.  


I can't believe I stayed in the lines!!
***********

And here it is - letters and swirls complete.  I topped the whole thing with 2 layers of clear varnish to give it a tough seal, ready  for being roughed up in the bathroom on a daily basis!


The kids' bath is slowly filling up with pretty things.  I grabbed this canvas recently at a discount decor store.  Love this song, love this sentiment.  


I changed the boring "builder" knobs out for this polka dot ball-knobs.  Just a tad of cute....


It's getting there.  Hubby has changed the light fixtures now and the room nears completion.  Hopefully I'll be able to share the whole space in a week or two!!

Please leave a comment.  I'd love to hear what you think.....

And please, BECOME A FOLLOWER.....  :)

Monday, October 29, 2012

Guest Posting @ "Pocket Full of Pink"

Hey everyone!!  C'mon on over to


and see my latest homemade art project.

Hope to see you there!!

B.  


Sunday, October 28, 2012

We Built a Desk for $60!!

Ooh! Yuck! What a weekend !  I don't think it stopped raining for longer than 33 seconds at a time in the last few days.  They say its the remmants of Hurricane Sandy whirling in and that she should be arriving full-force by Hallowe'en night.  Lovely.  We've already warned the kids that we may be throwing our own indoor Hallowe'en party if the bad weather keeps up.  My oldest looked a bit bummed upon hearing the news, but the other 2 were cool with it - as long as they still get to wear their costumes at home!!'

Speaking of my youngest - he is LOVING school!  In fact, if asked, he usually says kindergarten is "SUPER- AWESOME!!"
He's not much of a printer or reader, but he is becoming very excited about recognizing letter and number symbols and likes to do "pencil homework" with his older siblings.  On Friday he came home with this math activity - featuring the numbers 1-5.  He was so excited to show us how he had traced each digit and stamped the correct number of Hallowe'en stamps in each row.  
I was so proud. 
But where did my baby go?  He's a real big-boy now.  How the time really does fly......

We've been finishing our basement into a play/TV/work space for a few months now.  The walls and carpet are in and most of the furniture has been purchased and plopped in, too.  The last piece we needed was a desk that would span the length of one wall maximizing work/art/computer space for the whole family.  Unable to find something BIG and CHEAP, hubby and I put our heads together and came up with this.......


I found these small cabinets for $40 at a ReStore. The were plain and white and the perfect depth and height for what we were looking for.   Because I bought both she gave them  to me for $30.  Score!!


For the desk top, we needed a surface 20" deep and 85" long.  To create this, we put together two 10-inch wide pine boards ($10).  Dear hubby rounded one corner for looks and safety and I stained them a medium walnut colour ($5).


To fasten the boards to our cabinets, hubby used a variety of L-brackets ($5) that he attached to the underside, out of sight.
And here it is in place - a desk with the perfect length and height!!


Now you know there was no way I was sticking with those ugly plastic knobs!!  After a quick jaunt to the Home Depot I was the proud owner of 5 new brushed-nickel drawer pulls (5 @ $3 each).
I really like how they look like they have exposed screws, but really they are stamped into the metal.  


And here they are - the perfect jewellery for our plain white cabinets!!


TA-DA!!
Here she is, finished and in use!
(Sorry about the lighting in these pics - our potlights aren't all in yet so lighting is scarce down here!)


My woven stacking baskets were a steal from Goodwill! (Anyone else reading their Christmas magazines already??)


Mason jars for everything!!  


This lamp was a Goodwill prize too.  Well it was until I plugged it in and it didn't work!! Oh well.  It still looked good in the pictures!!


And here is where I edit all of my pictures - with the three kids usually watching a movie or playing LEGO nearby.  
Really, this room (and this desk) were the perfect investment in our home!


Thanks for coming by!  I'd love for you to leave a comment - and please, BECOME A FOLLOWER!!


Tuesday, October 23, 2012

Mom's Lemon Tea Loaf Recipe

Ah yes...another rainy day....Lots of inside  moments where I can witness this:

My big boy and my man - sharing a story (Star Wars of course!)


Rainy weather is the perfect time to do some baking.  
I love to bake.  It is real therapy for me.

My dear husband laughs at me - I can be having the worse day EVER, feeling overwhelmed and incapable of completing the regular tasks of the day. And instead of crashing onto the couch into a ball of cry,  I pull out my KitchenAid mixer, a bag of flour and I am off to the races.  My sadness and anger disappears and my family benefits from my new found mood - and some delicious cookies or loaves. 

The recipe I share with you today is an old fave from my childhood. My mother was/is a passionate baker, too.  I don't think I ever ate a store-bought cookie in  the first 10 years of my life - why would I when there was so much home-baking being done in our home.  


Preheat your oven to 325 degrees.  


In a large bowl, mix together:

2 1/2 cups all purpose flour
1 tsp. baking powder
1/2 tsp. salt
1 cup white sugar


Zest the peel of 1 lemon and cut it into teeny-tiny pieces.


In a smaller bowl, whisk together:

5 tbsp. softened butter
2 eggs
 1 cup milk
Lemon zest


Mom's recipe doesn't call for these additional ingredients, but I stirred in 1/2 cup of dried cranberries and 1/2 cup lemon flavoured baking chips.

*** EDITED TO ADD - I purchased my lemon baking chips came from the BULK BARN.  


Mix the wet ingredients into the dry.  Stir only to combine the textures. Do not over-stir or you'll end up with a tough loaf. 


Grease or line a loaf pan and spoon in the batter. 
Level it with the back of a spoon.


Bake the loaf for 50-60 minutes at 325 degrees. 

While the loaf bakes, make the glaze.

 Glaze:  Stir together 1/3 cup sugar and the juice from 1/2 the lemon.


Once the loaf is baked, remove it from the oven and poke the top surface with the tines of a fork.  
Drizzle the glaze over the top of the bread.  

Get ready to enjoy!!


I hope you give this recipe a try.  Let me know how it goes if you do!!

Welcome to my newest followers!
if you haven't become a FOLLOWER yet, please do.  I'd love to have more blog-reading pals!


Sunday, October 21, 2012

Pumpkins and Potions Mantel


Another October weekend come and gone.  Wow.  November will be here before we know it...and then.. dare I say it....Christmas??!!
Oh dear.  I mustn't think that far ahead.....
We took the kids out for a lovely walk this afternoon.  The trees still hold half of their leaves and the ones that have fallen created a colourful carpet along the path. Cool enough for hats and mitts too, but very sunny.

After returning from our outdoor trek, the kids BEGGED that I get started on the Hallowe'en decor. So, with 6 little helping hands, I put together a ....


My potion bottles are 3 French lemonade bottles that I usually use for serving drinks at our summer parties.  But once they were filled with green and blue "potions,"  and .....


....wrapped in some printable labels (found here) they became the exciting centrepiece of my mantel decor. 


My silvery jack'o'lantern is a new find from a discount decor store.  When I saw him I knew he would fit perfectly with my "orange-free" Hallowe'en decor.  The kids insisted that Jack needed some hair  - so in went some dried hydrangea.  Silly and pretty at the same time!!


This spider is the only "creepy" item I added to the mantel.  Lit, he adds a little ambience. 


 The raven was a request from my 3-year-old.  He said that the bird could "keep watch" over the mantel and fireplace.  Too cute.


 To add some texture, a hung a homemade grapevine wreath on the corner of one of the mirrors.  I have very few "natural" elements in this mantelscape so the curls and twigs of the vine add some interest.  


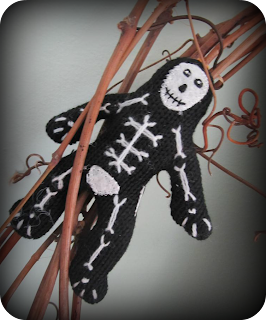
To dress up the wreath, I hung some small skeleton dolls in amongst the vine.  They are part of a set a of Hallowe'en ornaments that I picked up last year. ( The rest of the collection is helping to decorate my front porch - more on that later in the  week!)


These cute little guys were $1.00 at Target last month.  Sparkly and smiley - they are my daughter's favourite part of the mantel.  


We've had our fireplace for just over a month and already it has seen 4 makeovers!   I am sure once Hallowee'en has passed I'll get started on some "transitonal" decor that will fill the gap between spiders and pumpkins .....and reindeer and wreaths.  


Thanks for your visit!
It's wonderful to have so many new readers and followers.

If you like what you see, please leave a comment or become a FOLLOWER. I'd love to meet more blogging friends!


Tuesday, October 16, 2012

Cozy Knitting in Brown and Pink

Man- the weather has really taken a turn for the worst around here!  So much so that my mother, daughter and I headed out the other night to pick up this year's snowsuits and a collection of new mittens and hats. 
 I bought some really heavy duty, triple-layered, wet-proof mitts for each of the kids ($$$ - but really needed for our Canadian winters!) and a few pairs of these cheaper, thinner,
 fall kind of mitts.  
My mom and I laughed about how these gloves are just like groceries. You buy a few pairs, and within days they are all gone- lost on the first or second day of being worn!  The boys are especially good at randomly mis-placing a mitt or two.  
So, being the mom I am, I ironed on the kids name labels in hopes that if lost, these mitts would find their way home again.

A girl can dream, right?????


And now onto other COZY things....


Last spring my daughter fell in love with this thick, fuzzy varigated yarn at Michaels.  I, too, am a fan of pink and brown together so I jumped at the chance to knit her up a sweater in this pretty yarn.


I have knit this pattern before and find it quite easy and quick to complete.  It knits into a long straight cardigan that looks cute over a turtleneck and  leggings.


I love how the yarn seemed to knit itself into stripes- completely unplanned yet eye-catching....


To dress up the front of the sweater, I added a crocheted flower in 2 matching tones.  It's these little details that take the sweater from "nice" to "designer."

For a little extra kick, I crocheted up a few more flowers and added them to the lower back of the sweater. 


Afton was very delighted with this little addition!


Last night I also completed another little knitted project. I can only show you a small glimpse because it is destined for a friend's new baby.  The yarn is a lovely peachy tone with a fine silver thread running through it.  I fell in love with it while visiting York while on our trip to the UK in the summer.  


I bought enough yarn for 2 little sweaters. 
 Hmmm....I wonder who will receive the next little sweater in sparkly peach.....?