Pages

Sunday, October 14, 2012

Turquoise Stenciled Walls in the Kids' Bathroom

Hi all.  Just a quick post at the end of a very relaxing weekend. Hubby , the kids and I hung out home all weekend - no big events, just lots of family time inside and out.  

I tried to finish a few jobs around the house and got caught up with some projects that have been half-done for ages.  

One particular thing checked off my "finish" list was....


Four years ago I decorated the kids bathroom in the bright shades of turquoise and orange.  I has seen this colour combo in an issue of Better Homes and Gardens and knew the pairing would be perfect for a light-hearted kids bathroom.  

I painted the walls turquoise and added several orange accessories.
As the years have  passed, the room had started to look ragged- the paint is scratched, the towels are stained and the rug has lost its bright colour.  


So after 4 years, orange is on its way out!  Time for a "freshen up" and the introduction of a new accent colour.....


Instead of re-painting the whole room, I touched up the aqua paint in several places.  Then using a stencil from Cutting Edge Stencils, I began to add a little interest to the plain, painted walls.  


I chose a darker turquoise as the stencil colour. I figured it would add detail without overkill.  
It took a few minutes to position the stencil  at the correct angle, but once I had taped it in place, the paint rolled on smoothly and easily.  


After about 2 hours, I had 1/2 of the wall covered in this "Cathedral Window" pattern.  


Then I hit the wall.  Throughout the process I had been stenciling across and up the wall at the same time.  Then all of a sudden, my stencil wouldn't match up.  The pattern wouldn't fit together horizontally AND vertically.  
What had I done?  How could it go so well for so long and then all of a sudden fall apart?? 

I quickly realized that all I could do was  roll some of the base colour over the messed-up area and try again. 

(This was very hard to do after all of my hard work, but luckily it all came together the second time around...)

After 2 more hours, the wall was done!!
One wall - quite enough to stencil, let me tell you!


Hubby then hung the newly re-furbished towel rack on the freshly painted walls and the room was another step closer to completion!!

I bought this hanging rack at a discount decor shop.
I love the glass pulls and the distressed finish.
I added some wooden letters to personalize it for my three kids, A, B & C.


TA-DA!! 
There we go- a cool pattern on the wall and the introduction of an new accent colour.  


I have a few other projects up my sleeve that will add ever more red to this particular room. I can see sewing, hand-painting and new accessories in the near future.  I can't wait to show you the rest as it all comes together.....

Thanks for popping by. Please leave a comment and BECOME A FOLLOWER!  My goal is to have 250 by Christmas!!


Wednesday, October 10, 2012

Autumn Leaf Paper Banner

Middle of the week already!!  Goes time flies when you work full-time and raise 3 kids!

Tonight my daughter Afton and I fit in some crafting time in between homework and piano-practise time.  I had made these darling little paper pumpkins with my kindergarten class in the past and I knew they'd be a cute thing to make together with only the simplest supplies needed!
Craftin' Afton did most of the work - I just told her where to put the glue!


After bed time, I did some of my own paper crafting, too.....


I recently bought this Cricut cartridge - and let me tell you - it gets used A LOT!!  You might remember my Welcome Back Pennants that I made for school - everyday I get compliments on them.  
But I was yet to make something to hang in my home, so tonight was the night...


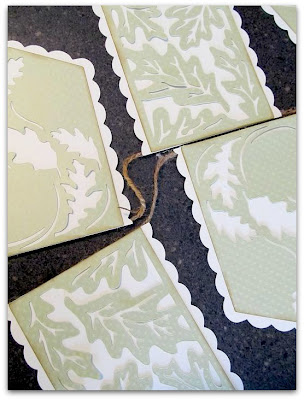
Using the cartridge and my Cricut, I cut out the very detailed leaf pennants in a pale green colour and the matching scalloped border in cream.  These two shades work perfectly in my dining room where I am using a softer pastel palette in autumn decor this year. 


Once a placed the layers together I felt that there needed to be more contrast between the colours so I used my scrapbooking ink to age the edges.  


In keeping with the aged look, I hung my seven pennants across a string of twine.  


To add a little more interest I dug out my antique button collection and applied a few to either side of each pennant.  


What a simple project but it adds a little "something" to my dining room window.  


I can hardly wait to get to work on a Halloween banner - perhaps with spiders and their lacey webs.  And  I bet Craftin' Afton will join in on that fun, too.   
Heck - I bet her brothers would be into it, too - after all, it does involves SPIDERS!!! 


Sunday, October 7, 2012

Blue and Yellow Autumn Porch

Hello again.
It's Thanksgiving weekend here in Canada.  I've taken a ton of pictures over the last few days, but this one of my favourites.

The autumnal colours are amazing this year.  So much red mixed in with the less exciting yellow and brown.  I love it!!

Now after making that "I love red" comment above, I feel silly leading into this, my far from traditional fall front porch post....


Yep - no red, brown or orange to be seen here.  Instead, I took inspiration from my navy blue front door and went with blue, grey and yellow.  
And here is how I did it:

First of all - orange pumpkins weren't going to work here.  So...

I taped off the pumpkin's peduncles (that is the scientific name for the "stem") and hit them with some antique white spray paint.  
I used some painter's tape to square off some blocks so that I could colour-block with a few different colours.  I also covered another pumpkin with polka dots created using a wine cork dipped in yellow paint.  


My wreath began as an ugly $2.00 frame from the thrift store.  I covered it with silver spray paint and added blue ribbon and a mix of yellow silk flowers.  


And here's how it all came together.....
First I covered my white porch table with a small grey carpet. 


On top I placed a pre-planted pot from the Home Depot.  And I can't get enough of those little white pumpkin gourds.  Cute, eh??


In the tall metal planter a 9" pot of yellow mums added more sunshine colour to the vignette.  


And how about some sticks for texture??


On the chair, a cozy crocheted blanket and soft cushy pillow.


And how did the pumpkins turn out? Take a look for yourself.


I was going for a "Mondrian" look on the colour-blocked pumpkin.  And the dotty-pumpkin?? It feeds my polka-dot obsession!! 


Overall, I am very pleased with my "alternate autumn" porch.  


My kids are already itching for me to get out the outdoor Halloween decor.  I told them that we'd wait a week or so. Do you think they'll hold on that long??  

Who knows...I may be back with a re-decorated porch before you know it!!


Wednesday, October 3, 2012

An Autumn Tablescape

Hi there everyone.  So glad to see a few more followers around here lately.  Thanks so much for joining me on my blogging journey!

Speaking of journeys...our family participated in an important one this past weekend.  
My father passed away from ALS 18 months ago at the young age of 63.  Some ALS patients live for 25 years after diagnosis.  My father wasn't as lucky.  From diagnosis to his journey to heaven was less than 8 months.  
To remember him, and to keep his spirit alive, we have participated in the Walk for ALS, hoping to raise lots of $$$ for families who are still struggling with ALS in their lives.  "TeamDoug" (that was my dad's name) raised more than $1000  for the cause this year.  

Here are some shots of the day- all of us dressed in the ALS colour, purple - which also happened to be my father's favourite colour, too.  

Miss you everyday, Daddy!


Now onto the tablescape....


Earlier in the week I showed you this tumbler patchwork table runner that I made as a jumping off point for my fall decor in the dining room.  

After a few visits to the thrift store I decided to add some pewter to my arrangement, too.   I love how the tarnished look of the silver adds warmth to the pieces. 


Up on the pedestal (which was sponge-painted green and burgundy before I hit it with pewter spray paint!) I placed a few faux gourds from Michaels and a real white mini-pumpkin.  


On the lower tray I tried to mix textures and shapes - vintage Bell jars, gourds and wooden elements.

Close-up you can see a jar of real acorns that my daughter and I collected from a family member's yard, large wooden acorns that I fell in love with at Hobby Lobby and a soft green gourd.  


In the other jar, I slid in some faux mini -gourds.  I wish I had bought more of these from Michaels.  Live and learn I guess...


Talk about a texture mix! These woven wooden balls look so striking against the soft colours of the table runner.  


Overall I rally like how this vignette turned out.  No orange or red here, but lots of autumn spirit anyways.  


Thanks for your visit! Please leave a comment- I love reading those...

And BECOME A FOLLOWER!   I really want to hit that 200 mark!! 

Hugs,

Bronwyn


Sunday, September 30, 2012

Pastel Patchwork Table Runner

Happy October!! The beginning of another month.  September seemed to fly by, didn't it?  I think it will Christmas before we know it!!

Look what we bought this weekend:


Oh yeah.  I've been wanting one of these  for a couple of years now and this baby is OURS!!  It will sleep our family of 5 perfectly and be an excellent home away from home whenever we want to travel the countryside.  She is clean and well-maintained - the only changes I will make will be cosmetic.  So, next spring I'll have plenty of sewing and re-upholstering to do - but I am already looking forward to it!

Now onto a project I have already  done this fall...


I am not an expert quilter/patchworker.  I like to mix fabrics and try new patterns- so when I find something pretty or inspirational (I love you Pinterest!) I give it a go. I may not do it the conventional way, but quite often I like how it turns out.

I had been admiring some Tumbler Block quilts online and thought I'd give one a try.  I used 2 charmpacks of Butterscotch and Roses fabric and cut my 5" squares into the odd shape you see below.  

As you sew the pieces together you make straight rows that are sewn together to make the decorative "top" of your creation.
I used a thin batting and cream fabric for the underside.  Then I  machine "stitched in the ditch" to quilt the layers together.


I really like how the subtle colours go together.  

They go perfectly with the mellow colours in my living/dining room.
  

In fact, this year, I am not using any intense autumn colours in my fall decor. Instead I am using a mix of these pale blues, peaches, greens and pinks to create my vignettes throughout the room.
(I'll show you my dining table vignette later this week....)


Hubby said he liked the picture below the best.  My intention was to shoot a photo of the whole table runner and then crop out any extras (like my feet). But, as you can see, I decided to leave them in.   :)


My faux gourds are from Michaels.  They are 40% off this week.
And the hydrangeas? Dried - from my mother's garden.  I love the subtle green shade they have turned as they dried.....


Thanks for stopping by.  I'd love for you to leave a comment.....and please - become a FOLLOWER.  I have been stuck just under 200 for ages now!!

Hugs to all,

Bronwyn